Android/App개발2010. 11. 29. 17:49

Package의 Add와 Remove시를 알고 싶다면 아래와 같이 한다.

1. Manifest에 receiver등록

<receiver android:name=".IntentReceiver">

<intent-filter>

<action android:name="android.intent.action.PACKAGE_ADDED" />

<action android:name="android.intent.action.PACKAGE_REMOVED" />

<data android:scheme="package" />

</intent-filter>

</receiver>


2. Receiver class구현


public class IntentReceiver extends BroadcastReceiver {


@Override

public void onReceive(Context context, Intent intent) {

Log.d("_PACKAGE_OBSERVER_", "intent : ");

Log.d("_PACKAGE_OBSERVER_", "  action = " + intent.getAction());

Log.d("_PACKAGE_OBSERVER_", "  data = " + intent.getData());

}


}


위와 같이 하면 data에 package명을 확인하여 어떤 패키지가 추가되거나 삭제되었는지 알 수 있다.


Posted by 삼스
Android/App개발2010. 11. 15. 17:40

하마터면 삽질할 뻔 했는데.. HashMap은 Parcelable을 implement하려고 하면 런타임에 에러가 남.
이에 대한 대안은 그냥  Bundle을 사용하면 되는데 Bundle은 내부에 hashmap을 데이터구조로 사용중임.

따라서 hashmap형태의 데이터를 다른 프로세스와 공유하고자 할 때는 Bundle을 사용할것~!

Posted by 삼스
Android/App개발2010. 10. 28. 14:18

코드 난독화툴을 안드로이드 프로젝트에 적용하는 포스트를 이미 올린바 있습니다.
이번에는 프로젝트에서 일부 클래스들만 묶어서 배포하고자 하는 경우 jar파일로 만드는 경우가 있을 것인데 이 경우 jar file하나만 proguard를 적용하는 방법에 대해 설명하겠습니다.

프로가드 gui툴을 이용하면 편하게 진행이 가능합니다.
프로가드 사용시 중요한 것이 옵션을 어떻게 지정할 것인가에 대한 것인데.. 그 중에도 -keep옵션이 아주 중요하다 할 것입니다.
안드로이드 소스코드 난독화를 위해서 레퍼런스로 사용할 만한 옵션을 아래 나열해 보았습니다.

# 각종 옵션들 : 설명은 생략~~ proguard site의 설명을 참조하시길...

-dontskipnonpubliclibraryclassmembers

-optimizationpasses 5

-dontusemixedcaseclassnames

-dontpreverify

-verbose


# keep option들.. 

# keep옵션이란 난독화시 난독화를 하지 않아야 하는 코드들을 미리 지정하는 것으로 

# 안드로이드 jar파일이나 프로젝트의 경우 아래의 keep옵션들이 필요할 것입니다.

-keep public class * extends android.app.Activity

-keep public class * extends android.app.Application

-keep public class * extends android.app.Service

-keep public class * extends android.content.BroadcastReceiver

-keep public class * extends android.content.ContentProvider

-keep public class com.android.vending.licensing.ILicensingService

-keepclasseswithmembers,allowshrinking class * {

    public <init>(android.content.Context,android.util.AttributeSet);

}

-keepclasseswithmembers,allowshrinking class * {

    public <init>(android.content.Context,android.util.AttributeSet,int);

}

# Also keep - Enumerations. Keep the special static methods that are required in

# enumeration classes.

-keepclassmembers enum  * {

    public static **[] values();

    public static ** valueOf(java.lang.String);

}

# Keep names - Native method names. Keep all native class/method names.

-keepclasseswithmembers,allowshrinking class * {

    native <methods>;

}


위 옵션들과 함께 입력파일과 출력파일을 지정하고 참조하고 있는 라이브러리까지 지정하는 스크립트 코드는 아래와 같습니다.


# 난독화를 진행할 입력 파일명

-injars myjar.jar

# 난독화를 거친 출력 파일명

-outjars out_myjar.jar


# 입력파일이 참조하는 라이브러리들...

# 안드로이드용 jar라면 android.jar를 반드시 포함해야 할것이다.

# 그 외에 혹시 추가로 참조하는 라이브러리가 있다면 추가해 주어야 한다.

-libraryjars /Users/yosamlee/Desktop/android-sdk-mac_x86/platforms/android-7/android.jar

-libraryjars /Users/yosamlee/_TOOL/workspace/MyJar/lib/referencelib.jar


위의 스크립트를 모두 모아서 확장자 *.pro로 저장한다.


proguard설치 폴더로 가서 bin폴더의 proguardgui를 실행한다. 아래와 같은 커맨드라인 명령을 콘솔에서 입력하면 됩니다.


java -jar ../lib/proguardgui.jar


위 화면에서 "Load configuration ..."을 선택 후 앞서 저장해 둔 스크립트파일을 오픈합니다


스크립트 파일이 성공적으로 열렸다면 Process tab에서 "Process!"버튼을 선택하면 난독화 과정을 거칩니다.


...

  Number of branch peephole optimizations:     0

  Number of simplified instructions:           0

  Number of removed instructions:              0

  Number of removed local variables:           0

  Number of removed exception blocks:          0

  Number of optimized local variable frames:   0

Shrinking...

Removing unused program classes and class elements...

  Original number of program classes: 26

  Final number of program classes:    26

Obfuscating...

Writing output...

Preparing output jar [/Users/yosamlee/_TOOL/workspace/MyJar/bin/out_myjar.jar]

  Copying resources from program jar [/Users/yosamlee/_TOOL/workspace/MyJar/bin/myjar.jar]

Processing completed successfully


정상적으로 과정이 진행되었다면 위와 같은 성공하였다는 메세지를 보게 될것입니다.


이제 out_myjar.jar파일을 리버스엔지니어링 해보길 바랍니다.

원하는 만큼 난독화가 진행되었는지 말이죠~!

만족할 만한 결과가 나왔기를 바랍니다.


ps) 이미 느끼신 분들도 계시겠지만 위 과정은 proguardgui버전에서 그대로 수행이 가능합니다. 저는 왜 수동으로 스크립트를 만들었냐면요.... 옵션들이 하도 많아서 헤깔려서요. GUI버전이 편하신 분들은 그걸 사용하셔도 됩니다.


Posted by 삼스
Android/App개발2010. 10. 20. 11:20

상용이던 개인용이던 안드로이드는 자바코드를 사용하기 때문에 dex tool과 jad tool등을 이용하면 decompile을 통한 reverse engineering이 가능하다.
이를 해결하기 위해 코드난독화툴을 이용하여 reverse를 어렵게 하는 방법을 사용하게 된다. proguard는 코딩을 어떻게 하느냐에 따라 난독이 아니라 불독(?)하게도 가능하다. 즉 전혀 해독이 불가하게 할수도 있다는 것이다.

proguard툴은 stand-alone형태로 사용해도 되나 android project에 포함시켜서 구동시키면 좀더 쉽게 사용이 가능해진다. 
이 포스트는 그 방법에 대해 설명한다.

요구사항
1. Android SDK version 7이상을 사용해야 함
  -> ANT 빌드규칙에 컴파일이전과 이후단계에서 일정한 작업을 추가할 수 있는 구조를 지원한다.
2. Proguard 설치

절차
커맨드라인에서 수행함.
1. 특정프로젝트에 대한 build.xml을 만듦
    android update project --path ./MyAndroidProject
  build.xml파일이 생성됨. 실제 빌드를 아래와 같이 수행.
    ant release
  빌드가 되고 서명되지 않은 앱이 생성됨. 이 후 서명툴을 이용하여 서명된 앱을 만들수 있슴.
2. 서명된 앱 빌드하기
  ant release명령으로 빌드하면 빌드과정에서 생성된 local.properties파일을 수정
    key.store=/Path/to/my/keystore/MyKeystore.ks
    key.alias=myalias
  ant release
3. 코드 난독화과정 
  add-proguard-release.xml, procfg.txt파일을 build.xml파일 위치에 복사
  local.properties에 proguard설치 경로 지정
    proguard.dir=/Directory/Proguard/proguard4.5.1/lib
  build.xml에(최상단에위치) 아래 내용 추가
    <?xml version="1.0" encoding="UTF-8"?>
    <!DOCTYPE project [
      <!ENTITY add-proguard-release SYSTEM "add-proguard-release.xml">
    ]>
  build.xml의 project tag안에 위에서 선언한 XML entity를 포함시킴
    <project name="MyProjectName" default="help">
    &add-proguard-release;
  위의 모든과정이 완료되었으면 빌드
    ant release

**  주의 사항  **
난독화 도구를 사용하는 경우 빌드후 앱이 정상적으로 동작하지 않을 수있다. 이는 난독화를 하지 않아야 하는 부분들까지도 난독화가 이루어져서 코드가 동작하지 못하는 경우가 발생하는 경우이다. 예를 들어 AndroidManifest나 class name, jni or reflection등을 통해 실제 메소드의 이름을 참조하고 있는 메소드들까지도 난독화를 통해서 작업이 이루어질 수 있다.
첨부된 procfg.txt에는 이런 룰을 지정할수가 있습니다. 이는 proguard 인자들중 keep인자 파라메터를 지정하는 방법에 따름인데 아래와 같은 명령을 추가하면 클래스이름을 찾지 못하는 문제는 방지 가능하다.

-keep public class * [my classname]

** 빌드중 obj directory가 생성되는데 여기에는 디버깅을 위한 다양한 출력파일들이 저장된다. 디버깅시 이용가능한다.
** mapping.txt 은 클래스가 어떤식으로 난독화 되었는지 기록한다.
** mac에서만 발생하는지 확인되지 않았으나 위 과정 진행중.. 아래와 같은 에러메세지가 나올수 있다.
add-proguard-release.xml:31: Expecting class path separator ':' before ';' in argument number 1
  이 경우 add-proguard-release.xml파일의 line35을 아래와 같이 수정하면 된다.
-libraryjars ${external.libs.dir};${libraryjarpath} -> -libraryjars ${external.libs.dir}:${libraryjarpath}


Posted by 삼스
Android/App개발2010. 10. 14. 18:20

안드로이드는 사정에 따라 서비스를 죽이기도 하며 나중에 다시 살리기도 한다.
만일 항상 떠있는 서비스를 구현하고자 하는 경우에는 이런 일이 발생하는것에 대해 아주 당황할것이다.
이럴경우 서비스를 죽지 않도록 하고자 할것인데.
이런 경우 알람서비스를 이용하여 서비스가 죽으면 다시 살리는 방법이 있다.
많은 경우 이런 방식을 이용하는것으로 보인다.

PersistentService가 죽지 않아야 할 서비스이다. 아래 예제에서 보면 onCreate시 기존 알람이 있으면 제거하고 onDestroy시 알람을 기동한다. 
알람은 일정시간이 지나면 PendingIntent를 날리는 알람이며 이 인텐트를 받을 수 있는 BroadcastReceiver가 있게 된다. 여기서는 RestartService receiver가 해당 인텐트를 받아서 이 때 종료된 PersistentService를 재기동 시키는 역할을 한다.

PersistentService.java
class PersistentService extends Service {

  onCreate(..) {
    unregisterRestartAlram(); //이미 등록된 알람이 있으면 제거
  }

  onDestroy(..) {
    registerRestartAlram(); // 서비스가 죽을때 알람을 등록
  }
 
  // support persistent of Service 
  void registerRestartAlarm() {
    Log.d(TAG"registerRestartAlarm");
    Intent intent = new Intent(PersistentService.this, RestartService.class);
    intent.setAction(RestartService. ACTION_RESTART_PERSISTENTSERVICE);
    PendingIntent sender = PendingIntent.getBroadcast(PersistentService.this, 0, intent, 0);
    long firstTime = SystemClock.elapsedRealtime();
    firstTime += 10*1000; // 10초 후에 알람이벤트 발생
    AlarmManager am = (AlarmManager)getSystemService(ALARM_SERVICE);
    am.setRepeating(AlarmManager.ELAPSED_REALTIME_WAKEUP, firstTime, 10*1000, sender);
  }

  void unregisterRestartAlarm() {
    Log.d(TAG"unregisterRestartAlarm");
    Intent intent = new Intent(PersistentService.this, RestartService.class);
    intent.setAction(RestartService.ACTION_RESTART_PERSISTENTSERVICE);
    PendingIntent sender = PendingIntent.getBroadcast(PersistentService.this, 0, intent, 0);
    AlarmManager am = (AlarmManager)getSystemService(ALARM_SERVICE);
    am.cancel(sender);
  }
}

RestartService.java
public class RestartService extends BroadcastReceiver {
  public static final String ACTION_RESTART_PERSISTENTSERVICE = "ACTION.Restart. PersistentService";

@Override
  public void onReceive(Context context, Intent intent) {
    Log.d("RestartService""RestartService called!@!@@@@@#$@$@#$@#$@#");
    if(intent.getAction().equals(ACTION_RESTART_PERSISTENTSERVICE)) {
      Intent i = new Intent(ctx, PushService.class);
      context.startService(i);
  }
}

manifest.xml
<application android:icon="@drawable/icon" android:label="@string/app_name">
<receiver android:name="RestartService" android:process=":remote"/>
Posted by 삼스
Android/App개발2010. 9. 28. 19:54

안드로이드에서 Push notification을 구현하기 위한 방법으로 XMPP를 이용하는 방법과 MQTT를 이용하는 방법이 있다..
여기서는 MQTT를 이용하여 C2DM을 지원하지 않는 안드로이드 2.1이하 버전에서 PUSH notification을 지원하기 위한 방법에 대해 설명한다.

안드로이드 앱에서 Push notification을 지원하기 위한 방안은 3가지정도의 방안이 있다.
1. 폴링
  이게 진정 push일까?? 어쨌든 단말에서 주기적으로 서버에 가져갈 메세지가 있는지 확인하여 push event를 수신할 수 있다. 
  장점 : 구현이 쉽고 비용도 안든다.
  단정 : 실시간이 아니지 않은가... 이런 젝일~!, 이는 배터리소모까지 발생시킨다.. 끔찍하다.이에 대한 정보는 링크를 참조하자. https://labs.ericsson.com/apis/mobile-java-push/blog/save-device-battery-mobile-java-push
2. SMS
  안드로이드는 SMS message의 가로채기가 가능하다. 서버에서 특별한 SMS를 단말에 날리면 앱에서는 모든 SMS 메세지를 가로채서 서버에서 날린것인지 확인하고 Popup Message를 띄울 수 있을것이다.
  장점 : 구현이 쉽다. 완전한 실시간이 보장된다. 알려진 솔루션도 있다. Ericsson lab의 자료를 참조하라 https://labs.ericsson.com/apis/mobile-java-push/
  단점 : 비용이 발생한다.
3. 끊김없는 TCP/IP
  폰과 서버가 TCP/IP 연결을 유지한다. 그리고 주기적으로 keepalive메세지를 날린다. 서버는 이 연결을 통해 필요할경우 메세지를 보낸다.
  장점 : 완전한 실시간이 보장된다.
  단점 : 신뢰성을 보장하는 구현이 아주 까다롭다. 폰과 서버쪽 모두 구현하려면 이야기가 복잡해진다. 또 안드로이드는 low memory등의 상황에서 서비스가 종료될 수도 있다. 그러면 동작을 안할것이다. 또한 단말이 sleep에 들어가지 않아야 하므로 유저들은 배터리문제로 클레임을 걸수 있다.

1, 2의 방법은 중대한 단점이 있다. 3번째는 가능하기는 하다. 하지만 먼가 개운치는 않다.

구글링을 통해서 몇몇 개발자들의 TCP/IP방식의 몇가지 좋은 시도를 찾았다.
Josh guilfoyle은 AlarmManager에 기반하여  오랬동안 살아있는 connection을 어떻게 만들것인가에 대해 언급했다. 그는 백그라운드에서 동작하면서 그 연결을 만들어내는 멋진 샘플코드도 제공하였다. http://devtcg.blogspot.com/2009/01/push-services-implementing-persistent.html

Dave Rea는  Deacon project를 최근에 시작했다. Meteor server상에서 comet technology를 사용하여 안드로이드에서 push notification을 지원하는 3rd party library를 개발할 예정이다. 아주 초기 단계이다.  http://deacon.daverea.com/

Dale Lane는 IBM에서 개발한 MQTT protocol로 android에서 push notification을 지원하는것과 관련한 많은 자료를 만들었으며 아주 훌룡한 샘플코드도 제공한다. http://dalelane.co.uk/blog/?p=938

위의 훌룡한 시도들을 기반으로 예제를 만들었다. 이 는 Josh Guilfoyle의 TestKeepAlive project 와 Dale Lane의 MQTT를 이용한 것이다.

TestKeepAlive project의 문제점은 raw TCP connection을 만든다는 것이다. 이는 push를 관리하는 서버를 별도로 작성해야 한다는것을 의미한다. MQTT를 이용한 예제의 경우 서버작업을 위해 IBM의 MQTT broker를 이용한다. 

mqtt는 publish/subscribe messaging protocol로 가볍게 설계 되었다. 가볍게 설계 되었다는 것은 '저전력 소모'를 지원한다는 것이다. 이는 끊김없는 TCP/IP connection을 고려해야 하는 모바일환경에서 가장 이상적인 해결책이다. 다만 MQTT의 단점은 개인의 프라이버시 보장이 약하다는 것등 몇가지 단점이 있기는 하다.

KeepAliveService와 raw TCP/IP connection을 MQTT connection으로 변경하는 것이 아이디어의 핵심이다.

Architecture
예제에서는 서버에서 PHP를 사용하였다. 이는 Simple Asynchronous Messaging library(http://project-sam.awardspace.com/)를 사용하였다.

system_diagram

wmqtt.tar 는 IBM에서 제공하는 MQTT protocol의 간단한 drop-in implementation이다.  http://www-01.ibm.com/support/docview.wss?rs=171&uid=swg24006006에서 다운로드 가능하다. 

Really Small Message Broker(RSMB)는 간단한 MQTT broker로 마찬가지로 IBM에서 제공한다. http://www.alphaworks.ibm.com/tech/rsmb에서 다운가능하다. 1833포트가 디폴트로 동작한다. 위 아키텍쳐에서 서버로부터 메세지를 받아서 단말에 전송하는 역할을 한다. RSMB는 Mosquitto server(http://mosquitto.atchoo.org/)로 변경이 가능하다.
SAM은 MQTT와 다른 요소들을 모아놓은 PHP library이다. http://pecl.php.net/package/sam/download/0.2.0에서 다운가능하다.

send_mqtt.php는 POST를 통해 메세지를 받아서 SAM을 이용하여 broker에 메세지를 전달하는 역할을 한다.

Sample code and Demo
push-app
이 예제는 TextView하나와 두개의 Button이 있다. 폰에 설치 후 서비스를 시작한 후 http://tokudu.com/demo/android-push/  에 가서 deviceID를 입력하고 메세지를 입력하라. 그러고 난 후 "Send Push Message"를 누르면 폰에서 메세지를 받을 것이다. 


MQTT는 사실 안드로이드에서 Push를 지원하기 위한 최적의 방법은 아니다. 하지만 잘 동작한다. MQTT의 가장 취약한 점은 broker가 동작하는 IP와 PORT정보를 누군가 알아낸다면 모든 Push message들을 가로챌수 있다는 것이다. 따라서 그런 정보를 encrypt하는것은 좋은 대안이 될것이다. 대안으로 당신만의 broker를 작성하여 MQTT에 인증을 추가하는것이 있을 수 있다.

이 예제는 더 테스트되어야 한다. 안정성은 보장못한다. 연결이 끊어지거나 예외상황들에 대한 처리가 더 개선되어야 한다. 


Posted by 삼스
Android/App개발2010. 9. 9. 18:57
http://blog.naver.com/huewu/110083320332

안드로이드에서 Service 를 사용하는 방법에는 크게 두 가지가 있습니다.


 첫번째는 startService() / stopService() 를 이용해서, 특정 Service 를 시작 하거나 종료 시키는 것입니다. 두 번째는, bindService() 를 이용해서, Service 의 IBinder 객체를 얻어온 후, 해당 Service 에서 정의된 API 를 호출 하는 방법입니다. 

 Service 에 Bind 한 후, API 를 호출하는데는 두 가지 방법이 있습니다. Local Service 로 구현하는 방법과 Remote Service 로 구현하는 방법입니다. Local Service 의 경우에는 Service 와 Service 를 이용하는 어플리케이션이 항상 동일한 Process 에서 작동하는 경우에 해당합니다. 이 경우 bindService() 의 결과로 바로 해당 Service 에 접근해서 원하는 API 를 호출 할 수 있습니다. 하지만 실재로 Service 가 돌고 있는 Process 가 아닌 별개의 Process 에서 API 를 호출 하고자 할 때는 반드시 IBinder 와 AIDL을 통해  RPC(Remote Procedure Call)이 이루어져야 합니다. 보다 상세한 내용은 안드로이드 개발자 사이트의 AIDL 관련 항목을 참조하시면 좋습니다.

  안드로이드 SDK 중에는Remote Service Binding 관련 예제가 첨부되어 있습니다. 하지만 예제의 경우, Remote Service 와 해당 Service 를 이용하는 어플리케이션 모두 동일한 Package 에 속해 있습니다. 그런데, 제 경우에 Service 를 제작하는 개발자와 Service 를 사용하는 어플리케이션을 개발하는 개발자가 달라, 작업상의 편의를 위해 서로 다른 Package 에 속한 완전히 구분된 형태로 구현할 필요가 생겼습니다. 

 그래서 서로 다른 Package / Process 에서 작동하는 Service 와 어플리케이션을한번 만들어 보려고 했습니다만... 생각보다 수월하지 않더군요. 몇 가지 삽질 끝에, AIDL 에 관련된 클래스를 하나의 패키지로 분리한 후, JAR 라이브러리로 생성하고, Service 와 어플리케이션 모두 동일하게 해당 JAR 를 참조하면 원하는 바대로 정상적으로 동작함을 확인 할 수 있었습니다. 

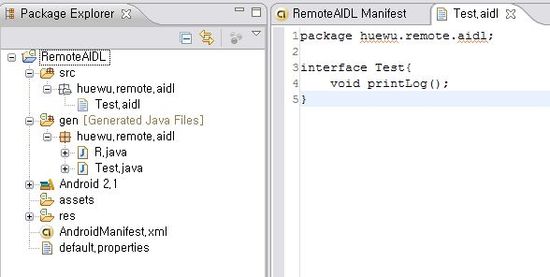
<AIDL 을 위한 프로젝트를 생성하고, 원하는 Interface 를 정의해 보았습니다.>

 AIDL 패키지를 생성하고 JAR 라이브러리로 뽑는 방법은 다음과 같습니다. 우선 안드로이드 프로젝트를 생성한 후, 원하는 인터페이스를 갖는 AIDL 파일을 추가합니다. 그러면 자동적으로 AIDL 툴이 작동하고, 해당 AIDL 인터페이스에 대응되는 클래스 파일이 생성 추가됩니다. (그림의 경우, printLog() 라는 API 를 갖는 Test.aidl 을 추가 하자, 자동으로 Test.java 파일이 생성되었음을 확인 할 수 있습니다.)

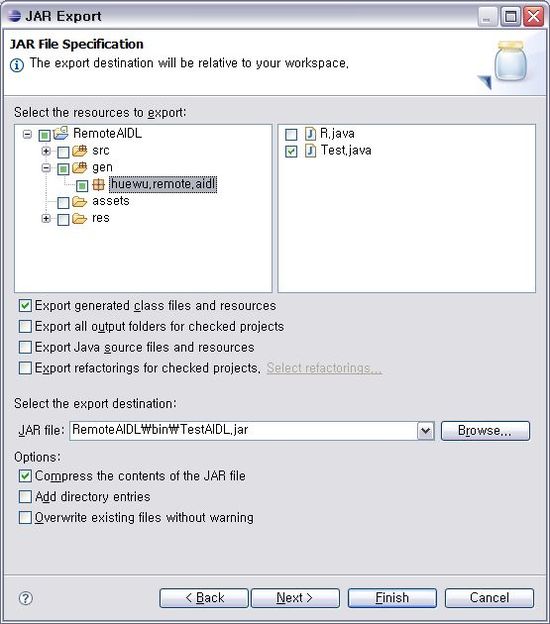
<일반적인 JAR 파일로 Export 하면 됩니다.>

 그 후, 해당 프로젝트에 대하여 JAR File 로 Export 합니다. 이 때, 그림과 같이 우리에게는 AIDL 툴이 자동으로 생성해준 Java  파일내의 내용만이 필요함으로, 해당 파일 외에 다른 것들은 포함할 필요가 없습니다. 특히 AndroidMenifest 파일을 포함하게 되면, 다른 안드로이드 프로젝트에서 해당 JAR 파일을 참조할 수 없으니 (중복된 파일이 존재해서...) 주의해야 합니다. 

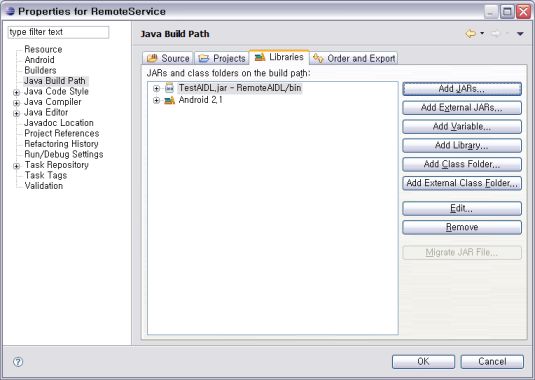
<생성한 JAR 파일을 프로젝트에 추가하자.>

 그 다음에는 구현하고자 하는 RemoteService 와 RemoteController 에서 해당 JAR 파일을 참조 라이브러리로 추가하면 작업 완료. 그 이 후의 방법은 일반적인 방법과 동일합니다. RemoteService 는 해당 JAR 를 참조한 후, JAR 내에 정의된 클래스를 Import 한 후, Stub 클래스를 구현하면 되고, RemoteController 에서는 bindService() 이 후에, JAR 에 정의된 대로, Stub 클래스의 asInterface() API 를 호출해서 AIDL 인터페이스 클래스를 생성한 후, 원하는 API 를 호출하면 됩니다.


 <결과가 볼품 없긴 하지만, 정상적으로 동작하고 있다...>

 그림을 유심히 살펴보시면, RemoteService 는 PID 274 인 Process 에서, RemoteController 는 PID 267인 Process 에서 작동 중이고, 로그창에서 확인 할 수 있듯이, PID 267 인 RemoteController 의 Process 가 RemoteService 의 API 를 호출 함을 확인하실 수 있습니다. 보다 상세한 구현 내용은 첨부한 압축파일을 풀어서, 세 개의 프로젝트를 살펴보시면 도움이 될 듯 합니다. (주석이 없어서 조금...애매하긴 하지만...)

 그런데 왜 이런 번거러운 작업이 필요하게 된걸까요?

 서로 다른 Package 를 사용할 때, RemoteController 는 RemoteService 에 바인드 한 후, 한 후, 자신이 Bind 한 Service 가 제공해주는 AIDL 인터페이스에 대한 정보를 알 수가 없습니다. 이 때 생각해 볼 수 있는 방안이 두 가지 있는데... 첫째는 Service 생성에 사용한 AIDL 파일을 그대로 또다른 어플리케이션에 복사해서 또 하나의 AIDL 인터페이스 클래스를 생성하는 방법이고, 두 번째는, 해당 Service 가 구현된 패키지를 참조하는 방법입니다. 두 가지 방법 모두 시도해 보았습니다만, 어플리케이션이 강제로 종료되고 말더군요. 

 우선 AIDL 을 그냥 복사하는 경우. 비록 AIDL 에 정의된 인터페이스와 자동으로 생성된 클래스의 구현 내용은 동일할지 모르지만, RemoteService 에서 사용되는 클래스와는 서로 다른 별도의 클래스가 생성되는 셈입니다. 따라서, bindService 를 통해 전달받은 IBinder 객체를 이용해서 원래 정해진 RemoteService 내에 정의된 클래스 외에 다른 클래스로 변환하고자 하니까 SecurityException 이 발생하게 됩니다.

 두 번째로, 단순히 해당 Service 를 참고만하는 경우에는 컴파일은 정상적으로 수행되긴 하지만, 실제 작동 시에 문제가 발생하게 됩니다. bindService() 를 통해 전달받은 IBinder 객체를 이용해 RemoteService 에 정의된 Proxy 객체를 생성하고자 하지만, RemoteController 패키지내에는 해당 클래스에 관한 정보가 전혀 없기 때문에, Class Definition 을 찾을 수 없다는 오류가 발생하게 됩니다. 

 저 개인적으로는 처음에, AIDL 파일만 있으면 어떤 어플리케이션이던지 손쉽게, 내가 스스로 작성한 Service 에 Bind 한 후, 원하는 API를 호출할 수 있을지 않을까 했습니다만... 세상에 쉬운일은 없더군요. 무슨일이던지 실재로 해보지 않고 마음대로 상상하지 말자...라는 걸 느끼게 해준 삽질이였습니다.
Posted by 삼스
Android/App개발2010. 9. 7. 14:56

1. jad 사용법
D:\javasrc\ojdbc14>jad -r -d src -sjava oracle\**\*.class

2. dex decompile 
 classes.dex 폴더 위치에 gen폴더 생성
 undx.jar과 AXMLPrinter2.jar파일을 classes.dex폴더 위치에 복사
 java -DASDKLoc=c:\android-sdk\tools -jar undx.jar classes.dex
   -> gen폴더에 classes.dex.dump와 classes.jar파일이 생성됨
 classes.jar파일의 압축을 해재
 jad로 class파일을 java파일로 decompile

3. AndroidManifest.xml
  java -jar AXMLPrinter2.java sourcexml.xml > targetxml.txt


Posted by 삼스
Android/App개발2010. 9. 3. 21:11
Wednesday, September 23rd, 2009 | Author: Tim
Mmmmm... Market Data...

Mmmmm... Market Data...

It turns out downloading a free application is actually pretty easy to reproduce. The things required by the google android servers are just four variables. The server needs to know your userIdauthToken,deviceId and the applications assetId.
The 
userId is a unique number that is associated only with your gmail account, the one that is currently linked to the phone. I’m working on getting a generic way to grab this number, though I believe the request is buried in an ssl request to the google servers. So for now, you can obtain your own userId by doing a tcpdump of your market traffic, just do a download of an application and look for a “GET” request in wireshark. There does not appear to be a “hard” maximum character on this, I’ve seen userIds as low as 8 in length and as high as 13. A bad userId will return a 403 forbidden response.
The 
authToken is sent in cookie form to the server, to authenticate that the user is using a valid and non-expired token and well, is who they say they are! This is linked to the userId and must match the account that the userId is taken from. Expired tokens will return a 403 forbidden response.
The 
deviceId is simply your Android_ID, and is linked in anyway to the authtoken or user-id, so feel free to spoof this.
The 
assetId is a number (negative or positive) that identifies the current stream of the application you wish to download. More on this later when I cover how to get live market data. Note that this number is not always the same - it (appears) to change when something from the application is changed. Originally I referred to this in my research as a “cacheAppID” for just that purpose.

  1. // Downloading apk's without vending/market 
  2. // Coded by Tim Strazzere 
  3. import java.io.FileNotFoundException; 
  4. import java.io.IOException; 
  5. import java.io.InputStream; 
  6. import java.io.BufferedOutputStream; 
  7. import java.io.FileOutputStream; 
  8. import java.io.UnsupportedEncodingException; 
  9. import java.net.MalformedURLException; 
  10. import java.net.URL; 
  11. import java.net.URLEncoder; 
  12. import java.net.HttpURLConnection; 
  13.  
  14. public class main { 
  15.     public static void main(String[] args) { 
  16.         // current assetId for the yahoo search apk 
  17.         String assetId = "7884814897504696499"
  18.         // input your userId 
  19.         String userId = "12345678901"
  20.         // spoof your deviceId (ANDROID_ID) here 
  21.         String deviceId = "2302DEAD532BEEF5367"
  22.  
  23.         // input your authToken here 
  24.         String authToken = "DQAAA...BLAHBLAHBLAHYOURTOKENHERE"
  25.  
  26.         String cookie = "ANDROID=" + authToken; 
  27.  
  28.         try { 
  29.             // prepare data for being 'get'ed 
  30.             String rdata = "?" + URLEncoder.encode("assetId""UTF-8") + "=" + URLEncoder.encode(assetId, "UTF-8"); 
  31.             rdata += "&" + URLEncoder.encode("userId""UTF-8") + "=" + URLEncoder.encode(userId, "UTF-8"); 
  32.             rdata += "&" + URLEncoder.encode("deviceId""UTF-8") + "=" + URLEncoder.encode(deviceId, "UTF-8"); 
  33.  
  34.             // Send data 
  35.             URL url = new URL("http://android.clients.google.com/market/download/Download" +rdata); 
  36.             HttpURLConnection conn = (HttpURLConnection)url.openConnection(); 
  37.  
  38.             // For GET only 
  39.             conn.setRequestMethod("GET"); 
  40.  
  41.             // Spoof values 
  42.             conn.setRequestProperty("User-agent""AndroidDownloadManager"); 
  43.             conn.setRequestProperty("Cookie", cookie); 
  44.  
  45.             // Read response and save file... 
  46.             InputStream inputstream =  conn.getInputStream(); 
  47.             BufferedOutputStream buffer = new BufferedOutputStream(new FileOutputStream("out.put")); 
  48.             byte byt[] = new byte[1024]; 
  49.             int i; 
  50.             for(long l = 0L; (i = inputstream.read(byt)) != -1; l += i ) 
  51.                 buffer.write(byt, 0, i); 
  52.  
  53.             inputstream.close(); 
  54.             buffer.close(); 
  55.  
  56.             System.out.println("File saved..."); 
  57.         } 
  58.         catch (FileNotFoundException e) { 
  59.             System.err.println("Bad url address!"); 
  60.         } 
  61.         catch (UnsupportedEncodingException e) { 
  62.             System.out.println(e); 
  63.         } 
  64.         catch (MalformedURLException e) { 
  65.             System.out.println(e); 
  66.         } 
  67.         catch (IOException e) { 
  68.             if(e.toString().contains("HTTP response code: 403")) 
  69.                 System.err.println("Forbidden response received!"); 
  70.             System.out.println(e); 
  71.         } 
  72.     } 

Hopefully someone will find this stuff useful ;) Better than me just sitting on it forever!

Posted by 삼스
Android/App개발2010. 9. 2. 20:48
emulator -system A:\froyo\out\target\product\generic\system.img -avd gsdk2.2
Posted by 삼스